Monday, December 7, 2009
BB cards
For this assignment we took the cards found inside magazines and recreated them using InDesign and Quark. Both programs had their positive and negative qualities. I prefer InDesign, because the layout is similar to Photoshop, and things are generally easier to find. However, there were some issues matching fonts exactly; where is says "Best Deal!" I could not find the font that matched the one on the card. Also in InDesign I had trouble making the arrow underneath the "Best Deal!". In Quark it was really easy to find the arrow shape and color it. In InDesign, it was easier to match colors than in Quark, which can be a little touchy about colors. Overall, I was surprised I was able to create something so similar to what is found in professional publications. The top card was made in Quark, the bottom InDesign.
Monday, November 30, 2009
Web brochure
This web brochure is the previous assignment translated into a web page. For each of the side bars I decided to include a picture to highlight the actions of Students for a Free Tibet, and what they stand for. There are also links down at the bottom to direct users to different pages containing further information about the conflict in Tibet and about the organization. The pictures are layered, so when you hover your cursor over the side bar the corresponding picture will move to the top. The red tinted picture is a picture of a Tibetan monk being detained by police, and the bottom picture is of a Students for a Free Tibet sweatshirt available for purchase at the online store. The top bar has the logo for the organization and the Tibetan flag. Over the words Tibet will be Free is a Buddhist mantra, written in Tibetan script, Om Mani Padme Hum. A Tibetan Aum, symbolizing peace, also serves as the page's background
Saturday, November 21, 2009
Students for a Free Tibet Brochure
The target audience for my brochure is anyone involved in the Students for a Free Tibet organization, or anyone wishing to know more information about it. I tried to include as much information as I could about the org's mission, and the history of the conflict in Tibet, while keeping the text to a minimum. I wanted to provide just enough information to arouse interest and provoke them to going to the website and learning more themselves.
When I started I had a vague idea of what I wanted to accomplish with the panels. The inside would have information about the organization, the history of the conflict in Tibet, and the mission of the organization. I decided that I wanted the About Us section to go first, that way whomever was reading the brochure would have some idea of what it was about before continuing on to the history part. We read left to right, so I wanted to put the more important information on the left inside panel. I wanted the back two panels to work together, so I included a picture of the Dalai Lama on the back left panel and a quote from him on the back middle panel. The two panels are the same color, so there isn't really a divide between them like there is on the inside. I chose to put the logo for Students for a Free Tibet on the front because it is really eye-catching.
I decided to make the back of the brochure black so that it would blend in with the Students for a Free Tibet logo. The white font stood out best from the black background and the black and white color scheme simulated the horrible things that are going on in Tibet now. The inside color scheme, red, yellow, and blue, are modeled after the colors on the Tibetan flag. The sun on the flag is yellow, while blue and red rays are being emitted from it. I chose the black font because it was simply, and too many colors can distract, or even turn off readers. Most of the text in the brochure is written in Tahoma because it is simple and easy to read.
In this brochure, I am most proud of the pictures that line the bottom of the inside of the brochure. On the website, they use a similar effect, tinting pictures and putting them at the top of the homepage. I wanted to do this to show some correlation between the brochure and the website. I chose those images because they were powerful examples of people demonstrating for Tibetan freedom. I used Photoshop and the Duotone effect to make the images red and blue. The way the pictures translated into InDesign and especially the clarity really impressed me.
If I had more time I would have put more work into the back panels. While I like the Dalai Lama picture and the quote, I feel that, compared to the inside panels, they are a little dull. Maybe I would have added a filter to the Dalai Lama picture, or another picture or two to go along with the quote.
Monday, October 26, 2009
Concert Poster
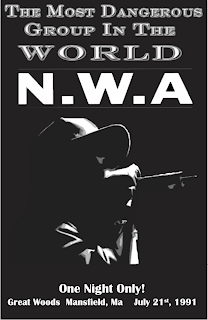
Creating a background in the Quark program was a lot different from creating a background in any other type of program. Instead of simply selecting a color or fill for the background, I had to use the create rectangle tool and draw a rectangle that covered the 11x7 poster. After creating the background shape, a color could be selected. I chose to go with basic black, as opposed to a brighter color or some fill effect. I wanted to keep the poster simple, let the words and the image speak for themselves instead of relying on fancy colors and fonts.
For each text and picture box I created a new layer, much like in Photoshop. This wasn't necessary; however, it was easier for me to get the exact layout I wanted by manipulating each layer individually. Also, my original rough draft called for text to overlap over images, and have certain effects behind the images. It was difficult for me to achieve this without creating separate layers because I couldn't exactly control the order of the texts, images, and effects. To create an image, I first manipulated it using Photoshop. There is a way to manipulate photos in Quark, but it was easier for me to do it in the Photoshop program. After I got the image how I wanted, I went back to Quark and created a picture box, than right clicked inside the box and selected import, and chose the image. The image then showed up in Quark and I was able to move it around and change the size so that it fit the exact area I wanted it to occupy. Most of the text I created in Photoshop first, only because it was easier to get the exact effect I wanted from Photoshop, then import it as an image into Quark. Another advantage of this is I was able to change the size and shape of the text just like an image; I could stretch the words out or make them taller, without having to worry about font sizes. I did use Quark to create the text at the bottom of the poster by creating a text box and typing right into that.
One of the biggest issues I dealt with in Quark was typing right into the text box. It was difficult to change the font, size, and get the exact effect in Quark, which I why I eventually just retreated back to Photoshop. However, I eventually overcame this and managed to create the texts at the bottom of the poster, which, while not as fancy as the top text, manages to get the job done. Overall, I'm most proud of the image in the poster. It took me a long time to finally settle on what image I wanted to use. My rough draft called for pictures of each band member; however, I quickly realized that this was unreasonable. Next, I wanted to use an image of an old 1964 Chevy Impala, echoing the band's first line from their first single, "Boyz-N-the-Hood", from 1987. I used the cutout filter in Photoshop and imported the image into Quark; however, the image just didn't go with what I was trying to convey on the poster. I finally decided to use an image of one of the band members holding a mic, like they were at a concert. I used an image of the rapper Ice Cube, and used the came cutout filter I used on the Impala image. This changed the image in such a way that you couldn't tell which band member the image represented. I also changed the coloring of the image to grayscale so that it fit with the black and white theme of the poster.
Monday, October 19, 2009
Music Powerpoint
For this Powerpoint project I chose the band Pearl Jam as the topic. I liked the band and I felt like I could make a compelling presentation on them and their music. To create the audio file that would serve as the background for the presentation, I chose to combine two of their songs, Jeremy and Evenflow. I thought these songs captured the essential sound of the band. To create the track I had to convert the songs into MP3 format and load them into a program called Audacity. Trying to splice the songs together so they flowed well was difficult. I tried many different combinations of the two songs, but I couldn't quite convey the message I was trying to send. Finally, I settled on using the beginning and chorus of Jeremy and the ending guitar solo in Evenflow. This let me show off the lyrical and vocal skills of lead singer Eddie Vedder while exhibiting the musical prowess of the rest of the band.
The second slide, the information slide, was by far the most difficult slide to create. I had to create at least 5 bullets with facts about the band. The hard part was coming up with just 5 facts, so I created 9 instead. Another difficult thing was making sure the bullets weren't too wordy. In a good Powerpoint presentation, each bullet should not exceed 8 words in length. Trying to whittle each fact down to 8 words and still have it be cohesive was difficult, especially since I wouldn't actually be presenting this to the class and thus have a chance to explain what I meant. This is what I am most proud of on this slide, that I was able to convey exactly what I wanted to without it being too wordy. I ran into another problem when it came time to animate each text box. I had each box come in, and after it came up it was supposed to fade to gray and the next text box would come in. I did this, and for a few trial runs it worked fine. However, I went to view the whole show, and instead of each box coming up, the boxes all came up at the same time and didn't fade to gray at all. After trying nearly everything, I discovered that it only did this when I had each box fade to gray. I decided to go against what the professor asked and keep each bullet white, because if I didn't it would ruin the whole presentation.
The third slide contained an album cover by the band the track listing for that album. I picked Pearl Jam's first and arguably most successful album Ten because that would be the album most people would recognize from them. I used the album cover that was used to the reissue of the cd because I thought it looked better on the slide than the original and it sent a more powerful message.
The fourth slide was a comparison table. I decided to compare three Seattle based bands: Pearl Jam, Nirvana, and Soundgarden. All were part of the same "grunge" genre and all were popular around the same time. I compared their album sales, award nominations, and award wins. Each part of the chart was supposed to come in individually. To do this, instead of using a chart provided by the Powerpoint program, I had to create my own. I used the Insert Shape tool to draw a rectangle for each row, and then drew four text boxes in each rectangle for the category and each one of the bands. Doing this allowed me to animate each individual text box, as opposed to animating the row as a whole.
The final slide was a collage of the band. I went to Pearl Jam's official website and used photographs taken during their recent live shows. I animated them, having them come in one at a time and then fading slightly as the next one came in. At the end, a hyperlink to the band's website would come in. For this slide, I am proud of the fact that I managed to set the timing so that some of the pictures would come in on time with the music. I am also proud of how I timed out each slide so the whole presentation lasted exactly as long as the song in the background.
Wednesday, September 30, 2009
Font Poem
For my font poem, I chose the quote "If you're quiet, you're not living. You've got to be noisy and colorful and loud." I chose this because it it expressed my outlook on life. If you go through life without doing anything, you're wasting your time. The quote also contained colorful language that I could turn into interesting font designs.
I used many different fonts to create my poem. In order I used: Banco Std, Balzano Std, Latin St, Balzano Std, ITC Ozwald Std, Rosewood Std, ITC Anna St, Juniper Std, Copal St, Greymantle MVB Std, Immi 505 Std for the "ands", Synchro LET, and Shruiken Boy St. I also used different tools to adjust the shape of the words, like manipulating the horizontal and vertical distortion, creating a bulge effect on the word, and using the fish-eye shape. The program allowed me to also create different effects with words, like, creating a rainbow effect in "colorful" and creating both outward and inward glows.
I arranged the words in the way I thought they would have the biggest impact, making "noisy, colorful, and lively" bigger and more colorful so they would stand out. I encountered a problem when I had to turn the background black and the font white. I discovered this could be accomplished by opening a new document with a white background, then going to Edit-Fill- and then selecting black. I am most proud of the ways I manipulated the color and shape of the words to achieve the effect that I wanted.
When adding animation, I did not want the words and collage to show up at the same time. The words tending to obscure the image, taking away from its impact. Also, having all the words on screen at the same time tended to crowd the picture. Having certain words on screen at the same time also emphasized the message I was trying to get across. Adding effect, such as having words fade in and out, also enhanced the animation and made it more interesting.
Wednesday, September 9, 2009
Contact Sheet
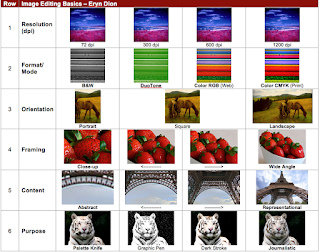
Before I even started the contact sheet I was nervous. I had never really used Photoshop before, and to be honest I wasn't quite sure what a contact sheet even was. The general idea was to take images and manipulate them in Photoshop according to the directions on the contact sheet, then drag the finished products to the corresponding parts on the sheet. The first row was Resolution. I had to take an image with 1200 dpi, or dots per inch, and decrease the dpi, all the way down to 72. I used Flickr to find an image with the appropriate dpi, which wasn't easy because most images are between 72 and 300 dpi, and professionals usually use around 600. Finally I found the image and dragged it into Photoshop. Per the instructor's request I had to make the image 1 inch tall, so that it would fit in the box on the contact sheet. To do this I went into the Image tab and down to Image Size. I learned that from here I could manipulate both the image height and width, but also the dpi. I changed the image height to 1 inch and clicked ok. Immediately my image shrunk way down. I saved it in a folder labeled Contact Sheet images, and from there dragged it into its corresponding space on the contact sheet. To change the dpi, I went back to the Image Size box, went down to where it said 1200 dpi, and changed it to 600 dpi, clicked ok, saved it, and dragged it into its spot. I did to make the image 300 dpi, and finally 72. Looking at the finished product, there wasn't really a distinguishable difference between the 1200, 600, and 300. However, there was a marked decline in quality between the 300 and the 72. The 72 dpi image was very blurry and low quality.
The next row was Format. Here I had to take an image and adjust the color. I selected an image from Flickr with a lot of color in it, so the differences would be noticeable. After dragging it into Photoshop, I changed the height to 1 inch then went back to the Image tab and selected Mode. From there I could change the colors of the image. I decided to start with Black and White, which prompts me to discard all color information. After choosing this, my image went from being a vibrant landscape to a gloomy spectrum of gray. Next I decided to select the RGB color mode. RGB stands for Red/Green/Blue and is the basic color scheme used to web images. When the image is printing, the printer will use these three colors to create the colors in the image. My vibrant landscape returned to its original color. After RGB came the more advanced CMYK mode. CMYK stood for Cyan. Magenta, Yellow, and Black. This color mode is used for professional prints as it allows for a wider and brighter spectrum of color. In Photoshop I didn't immediately notice a difference between the RGB image and the CMYK image. However, when viewed on the contact sheet, the difference became apparent. While the RGB image certainly wasn't dull, the CMYK image shined in comparison, the reds were redder, the yellows more yellow, everything was brighter and more vibrant. Finally I decided to try Duotone mode. According to Wikpedia, duotone is "a halftone reproduction using the superimposition of a contrasting black hafltone over a one color halftone." To me, a duotone is where you select two colors and the program combines them and then tints the image that color. You can use black and another color, you don't have to use black at all. First you have to set the image to Grayscale, then you can manipulate the halftones. I used a light red and a dark green, which made my image a kind of cool blue color.
The third row was Orientation. In this row I had to take a landscape image and crop it into a Square, and then to a Portrait. A landscape image is an image wider than it is tall. I chose an image of some horses grazing on a hillside, it would be easy to crop and still be a cohesive image. I set the image height to 1 and kept the width at 1.75. To create the square image, I selected the crop tool and had to adjust the size of the space I wanted to crop. Below the tabs on the top there is a space that allows you to enter the height and width you want your crop tool to be. I set the height and width to 1, and the crop tool allowed me to cut a perfectly square image of the horses. Next was Portrait. A portrait is an image that is taller than it is wide. For this, I selected the crop tool again, left the height at 1, and bumped the width down to .75 inches. The crop tool created a rectangle that size and I cropped the image down to a portrait of just a single horse.
The third fourth row was Framing. The main idea of this row was to take a picture and gradually zoom in on a single point until you have a close up. This required more skill than I previously thought. Finding a picture that would work for this exercise was difficult, the picture had to be at least 300 dpi, or else when I adjusted the height it would shrink to the size of a thumbnail. Finally I found a suitable picture of a basket of strawberries. My plan was to gradually zoom in on a single strawberry. To do this, I had to go to image size and adjust the height to 1 inch, and write down what the width was, 1.37 inches. After doing this I selected the Crop tool. Where I had before adjusted the height and width to create a portrait, square, and landscape I made the height 1 and the width 1.37. In doing this it ensured that instead of just cropping the picture it would zoom in. The first few times it did not work; it only cropped the image without zooming in. I tried putting in the dpi where I had put in the height and width and this worked. I created 4 images, gradually zooming in on an individual strawberry and each time dragged it into its corresponding spot on the contact sheet.
The 5th row was by far the most difficult. This row was Content. Using the same method in the Framing row, I had to gradually zoom in on some aspect of the picture until it became gradually more and more abstract. By the last close up it should be difficult to tell what the original image was. I decided that I wanted to do the Eiffel Tower, gradually zooming in on one of the legs or on the metal bars. I quickly ran into the same problem I had when doing the previous row; I couldn't find an image that was both big enough and had a high enough dpi that it wouldn't shrink to an unusable size. I spent the rest of class trying to find a usable image until I gave up and decided to try again the next day. The next morning, somehow the first image I saved was both large enough and 300 dpi. Relieved I dragged it into Photoshop and, using the same method in row 4, made the Eiffel Tower into a more abstract image. I zoomed in on one of the arches that forms the base of the tower. By the last picture no one would know what the image actually was, unless that had seen the original.
The final row, Purpose, was the most fun to create. For this row I manipulated the image using different filters. When selected, these filters altered the image. For example, selecting the Colored Pencil filter made the image look like it was drawn with colored pencils. I used an image of a white tiger because the contrasting white and black of the animal would compliment the different filters and make them more noticable. The original image went into the Journalistic square on the contact sheet, because it is the most realistic and would be used in print. After experimenting with all the different filters I chose Dark Strokes, which darkened the image and made the black thicker and more noticable, Graphic Pen, which made the image look like it was drawn with an artistic pen, and Palette Knife, which made the image appear blotted. For each of these filters you could adjust different aspects, for example in the Graphic Pen filter you can change the direction of the pen strokes and their thickness to create the exact image you wanted.
This project taught me a lot about the basics of Photoshop: cropping, dpi, image size, colors, and filters.
Subscribe to:
Posts (Atom)